Rozu
Rozu is a webhook API server, using MongoDB for persistent storage & Redis for pub/sub of inbound events

Each response will include a Link header, and an Array of Objects with IANA defined rel properties & URIs.
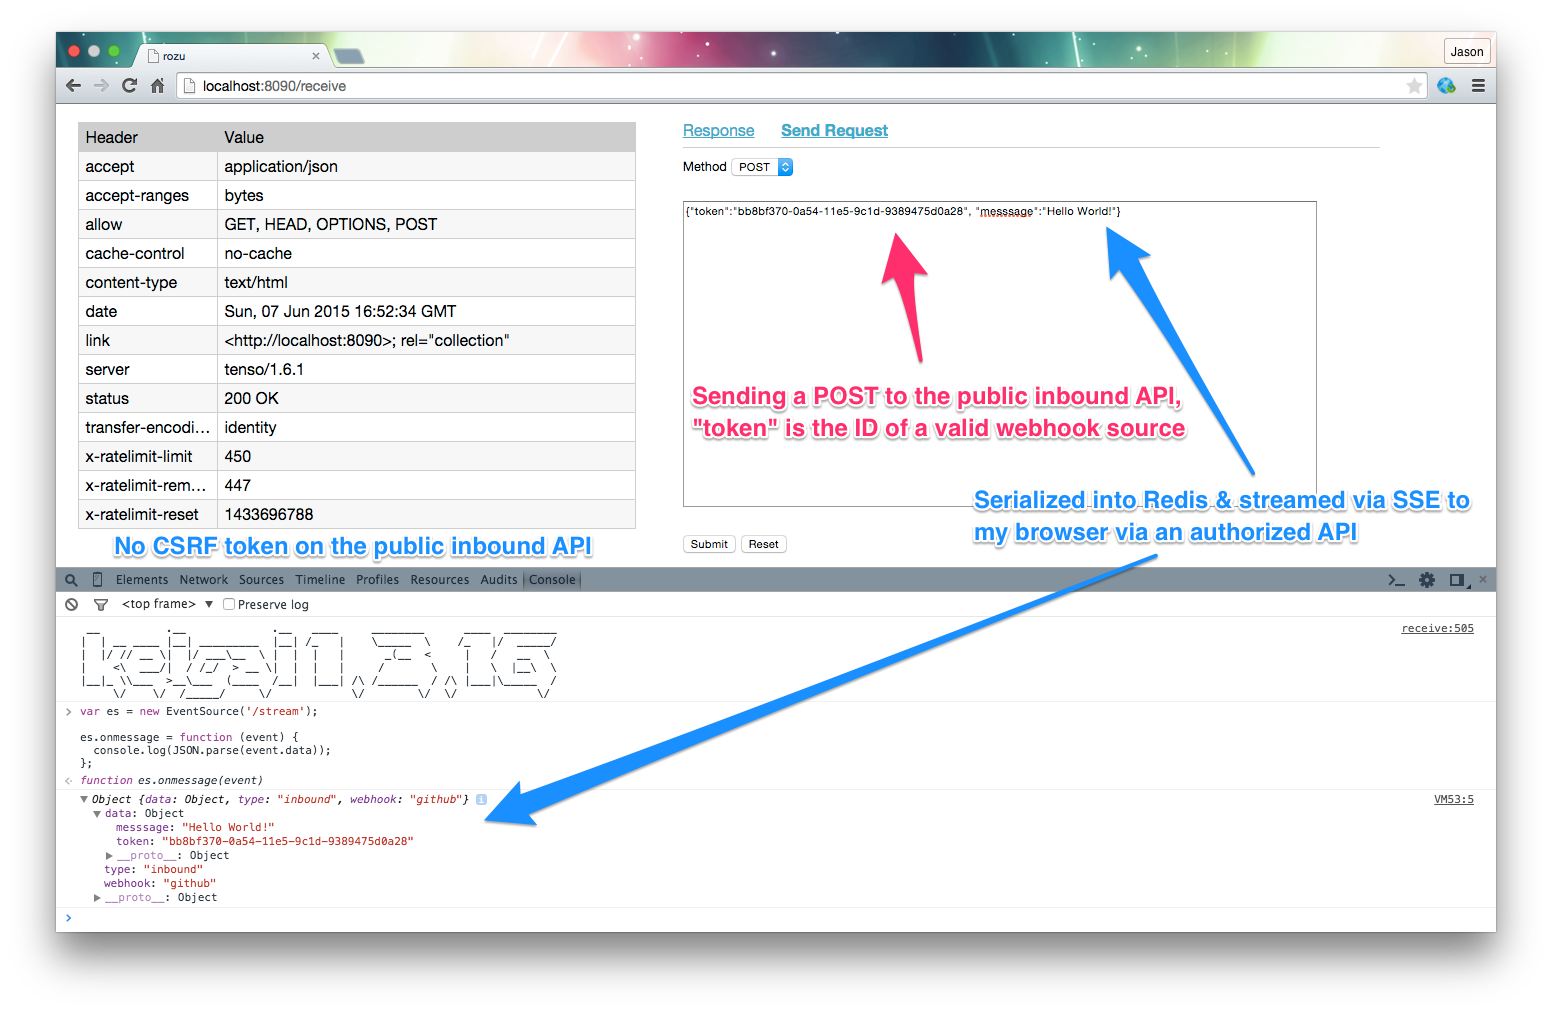
Receiving webhook events
Rozu has a publically accessible route /receive which will accept a JSON or form encoded payload & put it into Redis
for pub/sub behavior in your local stack. Inbound requests must include a user supplied token (token in config.json)
which maps to a registered webhook; tokens are v1 UUIDs.
Inbound events will be published with a channel name of config.id_webhook.name, e.g. "rozu_github".
Sending webhook events
Sending a webhook is as easy as publishing into Redis with a channel name of config.id_webhook.name_send,
e.g. "rozu_github_send", or POST to /send after authenticating at /login. Outbound webhook properties to configure
the request are uri, & encoding. If not specified encoding will default to json. The value of encoding can be
json, querystring, or form. The request body will contain the webhook id as the value of config.token, for
validation.
Custom headers for outbound webhooks are supported by specifying a headers value (an Object is expected).
Sending an outbound webhook from Redis may look like this:
clientPublish.publish("rozu_github_send", serialize({"token": "bb8bf370-0a54-11e5-9c1d-9389475d0a28", "message": "Hello World!"}));Requirements
- node.js or io.js
- MongoDB (persistent storage of accounts, & webhook configurations)
- Redis (pub/sub for local stack of inbound events)
- (Optional) nginx for SSL termination, & reverse proxy
How do I run Rozu?
Rozu can be up and running in 3 steps! When run in a production environment, it's recommended that you use nginx
to terminate SSL, and reverse proxy to Rozu. Using a daemon like upstart (on Linux) to run rozu is ideal.
- Clone this repository, or install from
npm:-
$ npm install rozu -
$ ln -s node_modules/rozu/config.json config.json -
$ ln -s node_modules/rozu/lib/app.js app.js
-
- Edit
config.jsonto configure your email server, etc. - Run via
node app.js
Upstart
Use the provided upstart recipe: sudo cp node_modules/rozu/rozu.conf /etc/init; service start rozu
Systemd
Use the provided systemd service: sudo cp node_modules/rozu/rozu.service /etc/systemd/system; systemctl enable rozu & systemctl start rozu
What about Windows?
You need to have Visual Studio Community Edition (or higher) installed, because some dependencies must compile.
Getting Started
The following steps outline how the system is intended to be utilized.
- Register an account
- Verify account
- Login with account
- Create a webhook by registering the remote host
Registration
To register, make a GET request to /register to retrieve instructions.
Registration is a two step process, requiring email verification. Please fill out email in config.json.
Authentication
To authenticate, make a GET request to /login to retrieve instructions.
To logout, make a GET request to /logout.
Your Profile
Make a GET request to /profile. You will have CRUD operations, defined by the allow header.
Getting Administrator Access
Once authenticated, make GET request to /admin; this requires your account email address in the admin Array in config.json.
Routes
A GET request to / will return different results, depending upon the state of your session.
Unauthenticated
{
    "data": [
        "login",
        "receive",
        "register"
    ],
    "error": null,
    "links": [
        {
            "rel": "item",
            "uri": "/login"
        },
        {
            "rel": "item",
            "uri": "/receive"
        },
        {
            "rel": "item",
            "uri": "/register"
        }
    ],
    "status": 200
}
Authenticated
{
    "data": [
        "admin",
        "logout",
        "profile",
        "receive",
        "send",
        "stream",
        "users",
        "webhooks"
    ],
    "error": null,
    "links": [
        {
            "rel": "item",
            "uri": "/admin"
        },
        {
            "rel": "item",
            "uri": "/logout"
        },
        {
            "rel": "item",
            "uri": "/profile"
        },
        {
            "rel": "item",
            "uri": "/receive"
        },
        {
            "rel": "item",
            "uri": "/send"
        },
        {
            "rel": "item",
            "uri": "/stream"
        }
        {
            "rel": "item",
            "uri": "/users"
        },
        {
            "rel": "item",
            "uri": "/webhooks"
        }
    ],
    "status": 200
}
License
Copyright (c) 2015 Jason Mulligan
All Rights Reserved